دنیای ترفند ( Trick world )
کامپیوتر ، دانلود نرم افزار ، شعر ، مطالب عاشقانه ، ازدواجدنیای ترفند ( Trick world )
کامپیوتر ، دانلود نرم افزار ، شعر ، مطالب عاشقانه ، ازدواجدرباره من
 مهندس کامپیوتر (نرم افزار)
فروش سامانه ارسال و دریافت پیام کوتاه
www.2972.ir
www.sms-ista.ir
javad_zah@yahoo.com
ساکن مشهد
---------------------
خدایا . . .
خواستم بگویم تنهایم
اما نگاه خندانت ، مرا شرمگین کرد
چه کسی بهتر از تــو ... !
=============
اگر تنهای تنها شوم باز هم خدا هست او جانشین تمام نداشتن های من است
---------------------
گفتیم پوستکلفت میشیم، دیگه راحت میشیم. نمدونستم پوست ِ کلفت که کنده شه دردش بیشتره
----------------
از تصادف جان سالم به در برده بود و می گفت زندگی اش را مدیون ماشین مدل بالایش
است و خــــــــــــــــــــــــدا همچنان لبخند میزد. . . .
----------------
غلط است این تفکر که بپنداریم زندگی می گذرد
بپذیریم عزیز ؛ زندگی می ماند ؛ من و تو می گذریم
--------------
این روزها نوازنده خوبی شده ام ...
دلم شور می زند ...
چشمانم تار ...
-----------------
دیگر کمتر اشـــک می ریزم ..
دارم بُزرگ میــشوم یا سنـــــگ ..!
نمی دانم ..!
---------------
هر جا دلت شکست
خودت شکسته ها رو جمع کن !
تا هر ناکسی منت دست زخمیشو به رخت نکشه !!!!
---------------
اینجا ایران است رسم آدم هایش عجیب است!
اینجا گم که مى شوى
به جاى اینکه دنبالت بگردند فراموشت مى کنند.....
---------------
کدام عاشقتر بودیم؟
من که
بخاطر عشق
دنیایم جهنم شد...!
... یا آدم که
بهشتش
دنیاشد...!
-------------
**لنگه های چوبی درب حیاطمان گرچه کهنه اند و جیرجیر میکنند! ولی خوش به حالشان که لنگه ی همند**
ادامه...
مهندس کامپیوتر (نرم افزار)
فروش سامانه ارسال و دریافت پیام کوتاه
www.2972.ir
www.sms-ista.ir
javad_zah@yahoo.com
ساکن مشهد
---------------------
خدایا . . .
خواستم بگویم تنهایم
اما نگاه خندانت ، مرا شرمگین کرد
چه کسی بهتر از تــو ... !
=============
اگر تنهای تنها شوم باز هم خدا هست او جانشین تمام نداشتن های من است
---------------------
گفتیم پوستکلفت میشیم، دیگه راحت میشیم. نمدونستم پوست ِ کلفت که کنده شه دردش بیشتره
----------------
از تصادف جان سالم به در برده بود و می گفت زندگی اش را مدیون ماشین مدل بالایش
است و خــــــــــــــــــــــــدا همچنان لبخند میزد. . . .
----------------
غلط است این تفکر که بپنداریم زندگی می گذرد
بپذیریم عزیز ؛ زندگی می ماند ؛ من و تو می گذریم
--------------
این روزها نوازنده خوبی شده ام ...
دلم شور می زند ...
چشمانم تار ...
-----------------
دیگر کمتر اشـــک می ریزم ..
دارم بُزرگ میــشوم یا سنـــــگ ..!
نمی دانم ..!
---------------
هر جا دلت شکست
خودت شکسته ها رو جمع کن !
تا هر ناکسی منت دست زخمیشو به رخت نکشه !!!!
---------------
اینجا ایران است رسم آدم هایش عجیب است!
اینجا گم که مى شوى
به جاى اینکه دنبالت بگردند فراموشت مى کنند.....
---------------
کدام عاشقتر بودیم؟
من که
بخاطر عشق
دنیایم جهنم شد...!
... یا آدم که
بهشتش
دنیاشد...!
-------------
**لنگه های چوبی درب حیاطمان گرچه کهنه اند و جیرجیر میکنند! ولی خوش به حالشان که لنگه ی همند**
ادامه...
آموزش ورود خودکار به ویندوز (Logon) بدون پسورد
فرض کنید در سیستم خود (به صورت Local ) چندتا User Account داشته باشید و میخواهید Administrator سیستم و یا دیگر User Account ها را مخفی کنید و درهنگام Log on کردن بنظر بیاد فقط یک User Account وجود دارد و دوست دارید تنها با Userی که انتخاب کردید با همان به صورت اتوماتیک بدون اینکه از شما چیزی بپرسد Log on کنید
(یعنی به صورت اتوماتیک وارد User Account انتخابی شما بشود)و این هم بگم که اگر با Account های دیگر کار داشتید باید Switch User کنید ( Windows+ L )همانگونه در شکل زیر میبینید در این سیستم دو User Account داریم و میخواهیم همیشه به صورت اتوماتیک مستقیما با User_itpro وارد شویم و دیگر نیازی نیست با صفحه زیری روبرو شویم دراین مقاله قصد دارم روش اتوماتیک وارد شدن و خلاص شدن از این صفحه را به شما آموزش دهم....
برای شروع عملیات در منوی Start در قسمت Search Box کلمه Netplwiz را تایپ کرده تا پنجره User Account باز شود
فعال کردن Automatic Log On
- تذکر: برای فعال کردن این قابلیت فقط کاربر Admin می تواند این عملیات را انجام دهد
برای شروع ابتدا User Account خود را انتخاب کرده و سپس باید تیک Users must enter a user name and password to use this computer را برداریم
و Apply را زده و در پنجره باز شده Passwordی که برای User خود انتخاب کردیم را وارد می کنیم و توجه کنید Password نباید فرق داشته باشد اگه پسورد دیگه ای وارد کردید هنگام Log in کردن Password اولی را از شما میخواهد بعد اگر User شما پسورد نداشت این فیلد را خالی بگذارید و OK را میزنیم
سپس سیستم خود را Restart کنید تا تغیرات را احساس کنید (-: برای تغییر دادن User ابتدا باید وارد این پنجره شوید و تیک Users must enter a user name and password to use this computer را بنید تا تا گزینه های این صفحه فعال شوند و سپس Userی که میخواهید به صورت اتوماتیک Log on کند را انتخاب کرده و سپس تیک بالایی را بر میدارید و عملیاتی که قبلا گفته شده را دوباره انجام می دهید
غیر فعال کردن Automatic Log On
برای غیر فعال کردن ابتدا باید وارد این پنجره شوید و تیک Users must enter a user name and password to use this computer را بزنید و OKکنید تا غیر فعال شود
نویسنده : مجید عچرش
Restoring Offline Clips(تغییر آدرس فولدر و فایلهای در Edius)
زمانی که آدرس فایلهای پروژه در نرم افزار Edius تغییر کند، میتوانید از این روش آدرس جدید ویدیو ها و صوت ها را به ادیوس معرفی کنید و در آدرس جدید ادامه پروژه را انجام دهید.
Restoring Source Link
This section explains how to restore the original source when the source cannot be referenced by the clip.
About Restoration of Offline Clips
This function helps to restore the original reference source file when you lost the link from the clip.
Clips registered in the bin are linked with their source. If the source used in a project file is moved or deleted, the clips linked to that source become offline clips.
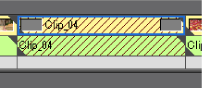
If there are offline clips on the timeline, an icon to indicate the presence of offline clips and the number of the offline clips are displayed on the timeline status bar.

The offline clips on the bin and the timeline are displayed as below, and the video and audio are both muted during the playback.
Offline clip in the bin
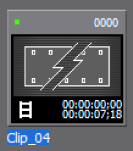
Offline clip in the timeline
Restoring Offline Clips
Select a restoration method for the offline clips.

The [Restore and transfer clip] selected dialog box appears.
[Restore and transfer clip] Selected Dialog Box
 Alternative
Click [File] on the menu bar, and click [Restore and Transfer Clips].
 Note
NoteRegistered clips that are reference AVI files will be marked as offline clips if any part of the source is moved. In such cases, the offline clips cannot be restored.
The reference AVI is a file containing only the audio data entity and destination information, developed by Grass Valley with its own extension within a range of the specification. It is different from regular AVI files.
Files can be captured or restored only when matching the following conditions:
Video information exists.
The reel name is set.
Source file extensions are *.avi, *.m2t, *.mov, or *.mxf.
[Restore and transfer clip] Selected Dialog Box
[Capture entire clip ] | The [Batch Capture] dialog box appears. Capture the entire source. |
[Capture only the area used in timeline] | The [Batch Capture] dialog box appears. Capture only the part used in the timeline. If there are multiple offline clips, replace each offline clip with the captured source. |
[Find from captured files] | Search the source by reel number (Ubit) and timecode (between In and Out points) in already captured files. |
[Open the clip restoration dialog] | The [Restore and transfer clip] dialog box appears. Restore the offline clips by reestablishing a link to the disconnected source, by retransfer the source that cannot reference a part of the clip, or by replacing a camera proxy file with a high-resolution source. |
[Close] | Click [Close], and click [Yes] to display the operation screen without restoring the offline clip. |
Re-link and Restoration
You can search the source from the hard disk drive to re-link.
The [Restore and Transfer Clips] dialog box appears.
[Restore and Transfer Clips] Dialog Box
AlternativeTo restore the clips on the timeline, double-click the offline clip icon on the status bar. In this case, only the offline clips on the timeline are displayed in the clip list in the [Restore and Transfer Clips] dialog box.
If [Relink (select folder)] is clicked in step 3, select a folder in the [Browse For Folder] dialog box and click [OK].
AlternativeDouble-click a offline clip on the timeline or in the bin window, and perform operations after step 3.
[Restore and Transfer Clips] Dialog Box
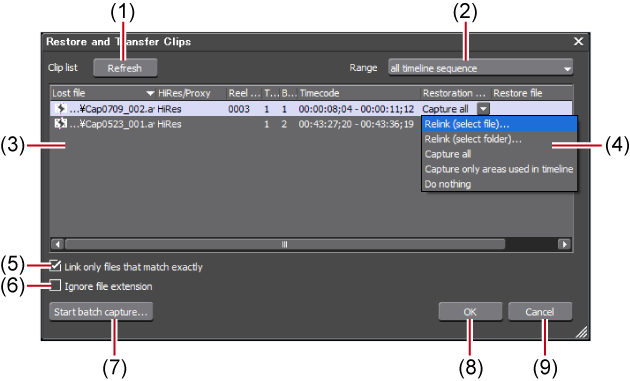
(1) | [Refresh] | Restore clips to which the restoration method is set. |
(2) | [Range] | Select the target range of the clips from the list. |
(3) | Clip list |  : Offline clips : Offline clipsClips whose links to the source are disconnected.  : Clips with restored links : Clips with restored linksClips whose links to the source are restored. |
(4) | [Restoration Method] | [Relink (select file)] The [Open] dialog box appears. Select the source to re-link. [Relink (select folder)] The [Browse For Folder] dialog box appears. Search the source with the same name in the specified folder to re-link. [Undo transfer] Re-link the original source prior to the transition to the project folder. [Capture all] Click [Start batch capture] to display the [Batch Capture] dialog box to register the information of the entire source. Importing Sources All Together (Batch Capture) [Capture only areas used in timeline] Click [Start batch capture] to display the [Batch Capture] dialog box to register the clip information used in the timeline. [Do nothing] Offline clips are not re-linked or captured. |
(5) | [Link only files that match exactly] | Check this item to specify only the files with exactly the same information in the original file to be re-linked. |
(6) | [Ignore file extension] | Check this item to include files with different extensions for re-link. |
(7) | [Start batch capture] | This item is enabled when either [Capture all] or [Capture only areas used in timeline] is selected from the [Restoration Method] list. Click this button to display the [Batch Capture] dialog box. |
(8) | [OK] | Restore the offline clips with the specified settings. |
(9) | [Cancel] | Close the dialog box without restoring the offline clips. |

You can change the default setting of [Restoration Method].
Capturing and Restoring
If the source of the offline clips does not exist in the hard drive, you can restore the clips by recapturing from the original source (recorded tapes).
The [Batch Capture] dialog box appears.
Importing Sources All Together (Batch Capture)
AlternativeIn the [Restore and Transfer Clips] dialog box, select either [Capture all] or [Capture only areas used in timeline] from the [Restoration Method] list, and click [OK].
Searching File by Reel Number to Restore
Search the source by reel number (Ubit) and timecode (between In and Out points) in already captured files.
The [Restore Offline Clip] dialog box appears.
Search a file in a folder where the project is saved. If you cannot find the file, click [Select Folder] and select a folder where the captured files are stored, and click [OK].
To restore selected files only, select a clip from [Find clip list] and click [Restore].
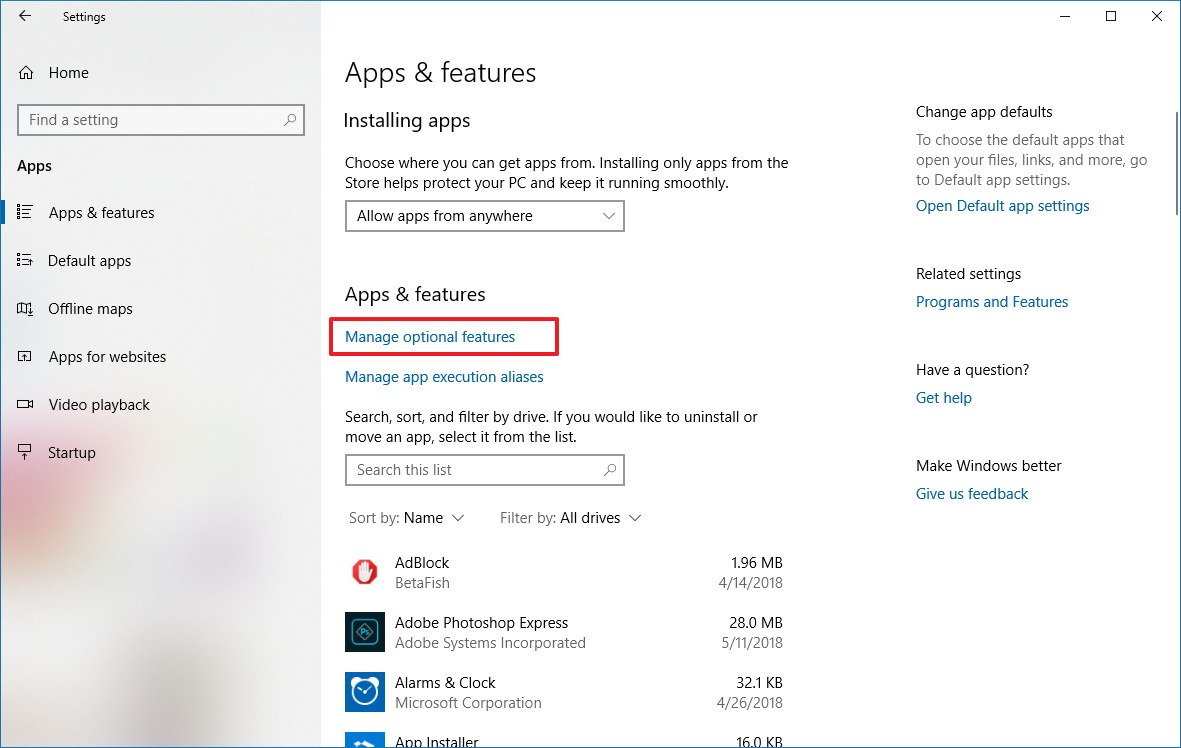
فعال سازی XPS Viewer در ویندزو 10
How to install the XPS Viewer app on Windows 10
In order to install the XPS Viewer app on Windows 10, do the following:
- Open Settings.
- Click on Apps.
- Click on Apps & features.
Under "Apps & features," click the Manage optional features link.
Click the Add a feature button.
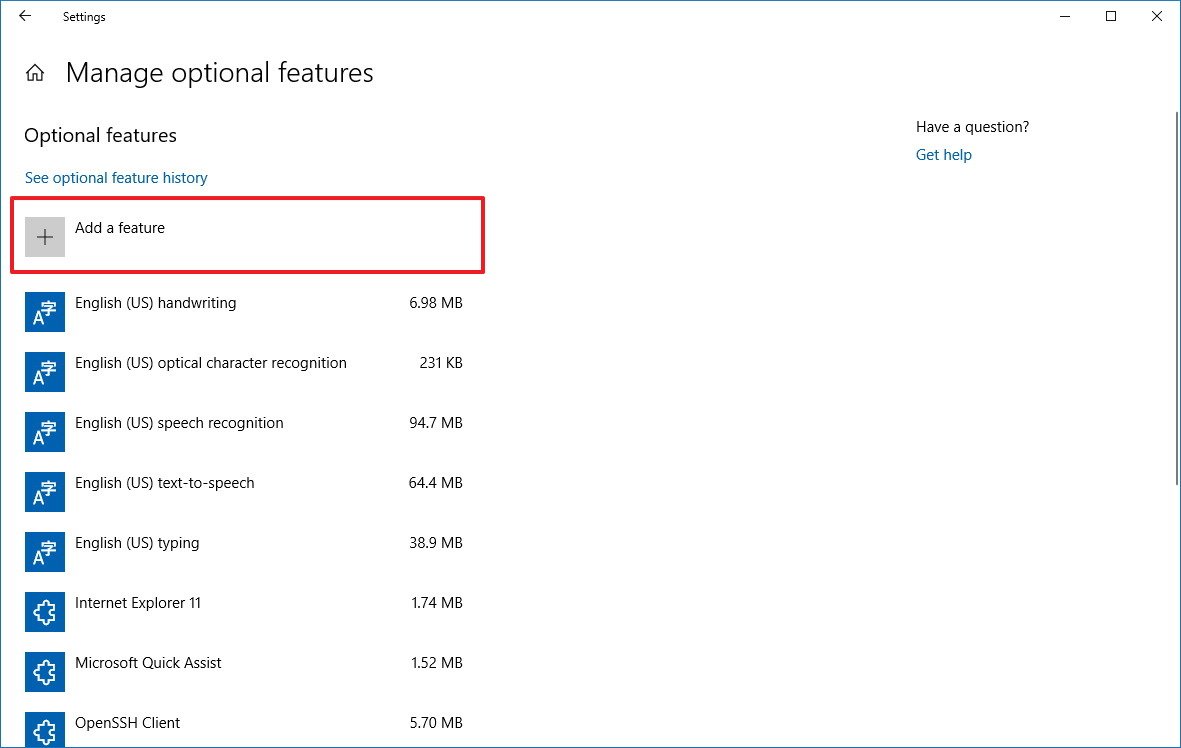
Select XPS Viewer from the list.

- Click the Install button.
After completing the steps, the XPS Viewer will install on your computer, and you'll once again be able to open files stored on your computer using this file format.
Converting XPS to PDF
While you can get this feature back, bear in mind that Microsoft is no longer maintaining it, as such it's now also a good time to convert those old XPS files to PDF or another file format.
Here's a quick way to convert your XPS files to PDF without having to resource to third-party apps:
- Open the XPS file using the XPS Viewer.
حل مشکل زمان طولانی بوت شدن ویندوز 10 برای گرافیک AMD و لپ تاپ های dell
سلام دوستان. بعد چند هفته استفاده از ویندوز 10 تنها مشکلی که با این ویندوز داشتم زمان طولانی بالا اومدن ویندوز بعد از نصب درایور کارت گرافیک AMD بود.
بعد از قرار دادن مشکل توی انجمن دوستان پیشنهاد می کردن یا درایور رو نصب نکنم یا منتظر آپدیت جدید درایور بشم یا برگردم به ویندوز 8.1
امروز خوشبختانه این آموزش رو توی یک سایت خارجی پیدا کردم و جواب داد و سرعت بالا اومدن ویندوز به حالت طبیعی برگشت:
استارت منو رو باز کرده و "regedit" رو تایپ می کنیم و سرچ رو می زنیم. روی گزینه ی "regedit" کلیک می کنیم تا پنجره باز بشه.
از منوی "Edit" روی گزینه ی "Find" کلیک کرده و کلمه ی "EnableULPS" رو در جای تایپ می نویسیم و روی گزینه ی "Find Next" کلیک می کنیم.
بعد اومدن نتایج جستجو روی گزینه ی "EnableULPS" دابل کلیک می کنیم تا تنظیمات باز بشه, بعد عدد "Value Data" رو از 1 به 0 تغییر می دیم و OK رو می زنیم.
مشکل زمان بوت حل شده و از دفعه ی بعدی دز زمان عادی ویندوز بالا خواهد اومد.
رفع مشکل Remote FX و رفع مشکل اجرای ویندوز مجازی در Hyper-v ویندوز سرور 2012
To configure the maximum resolution and number of monitors
-
Open Hyper-V Manager. Click Start, point to Administrative Tools, and then click Hyper-V Manager.
-
In the Results pane, under Virtual Machines, select the virtual machine that you want to configure. The virtual machine must be off in order to modify its settings.
-
In the Action pane, under the virtual machine name, click Settings. Then, in the navigation pane, click RemoteFX 3D Video Adapter.
-
On the RemoteFX 3D Video Adapter page, specify the number of monitors and resolutions, and then click OK.
Alternatively, you can use the Windows PowerShell cmdlets that are provided with RemoteFX to add the RemoteFX 3D Video Adapter.
To add the RemoteFX 3D Video Adapter by using Windows PowerShell
-
Launch Windows PowerShell with elevated privileges.
-
Type Import-Module RemoteDesktopServices and then press ENTER.
-
Type get-help add-VGPU to get usage information on adding the RemoteFX 3D Video Adapter.
If you add a RemoteFX 3D video adapter by using Windows PowerShell, you can then configure it by using Windows PowerShell as well.
To configure a RemoteFX 3D Video Adapter by using Windows PowerShell
-
Launch Windows PowerShell with elevated privileges.
-
Type Import-Module RemoteDesktopServices and then press ENTER.
-
Type get-help Set-vGPUConfiguration to get usage information on configuring the number of monitors and resolution for the virtual machine on which the RemoteFX 3D Video Adapter was added.
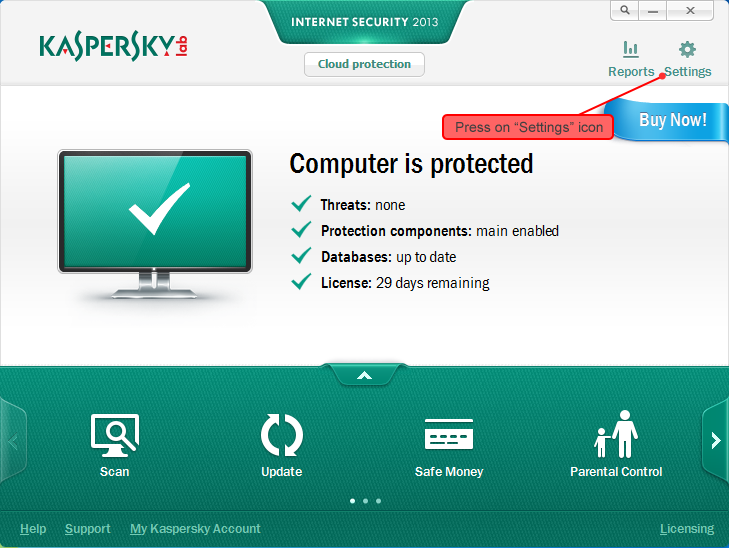
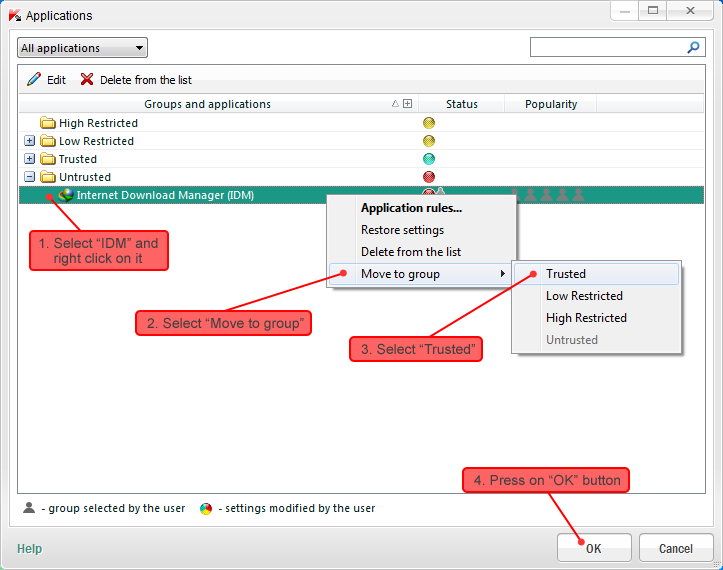
اجازه دانلود و دسترسی به اینترنت در آنتی ویروس کسپرسکی
annot start a download in IDM. An error occurs on download start.
 How to configure Kaspersky Internet Security to work with Internet Download Manager (IDM)
1. Run Kaspersky Internet Security.
2. Press on "Settings" icon on top right corner.
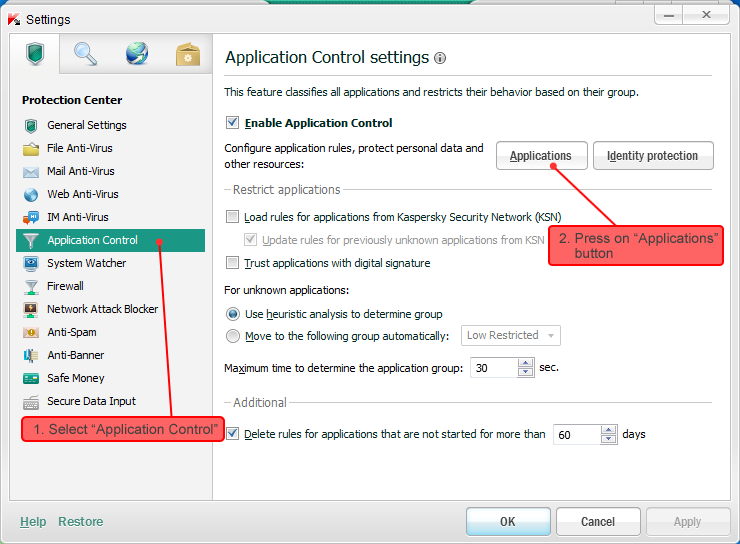
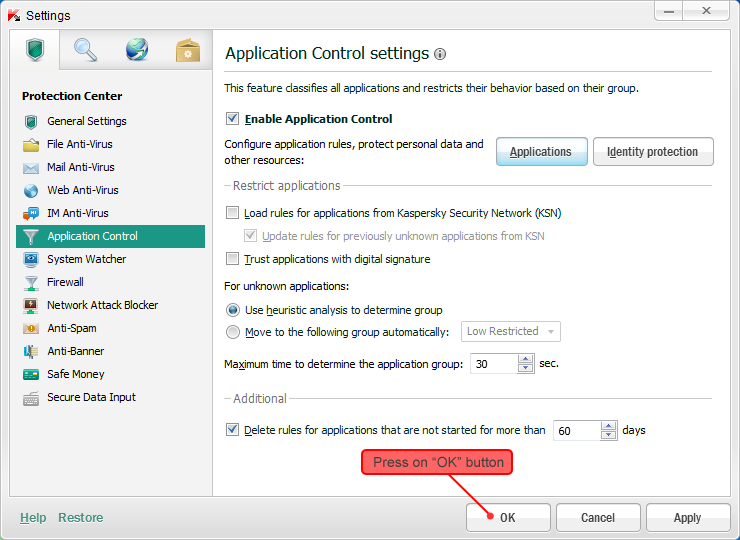
3. The new window opens. Select "Application Control" on the left column, press on "Applications" button on the right.
4. The new window opens. Open all groups marked with "+" on the left column and find "Internet Download Manager (IDM)" in the list. Select "Internet Download Manager (IDM)" and right click on it. select "Move to group" In right click menu and select "Trusted" submenu. Press on OK button.
5. In "Settings" window press on "OK" button.
After these actions IDM will start working normally.If after updating IDM stops running or downloading, you will need to repeat these actions from the beginning.
برای مشاهده نحوه فعال کردن دیگر آنتی ویروس ها و مشکلات دانلود با دانلود منیجر به لینک زیر مراجعه کنید
http://www.internetdownloadmanager.com/register/new_faq/problems1.html
خاموش کردن کامپیوتر بعد از مدت زمان تعییین شده
خاموش کردن ویندوز در ریموت دسکتاپ
بیشتر مواقع کاربران برای خاموش کردن کامپیوتر در یک زمان مشخص و بدون
حضور خودشان دچار مشکل میشوند. برای اینکار باید مراحل زیر انجام شود:
1- از منوی Start و در کادر Run ، عبارت cmd را تایپ کنید و اینتر را بزنید. پنجره خط فرمان (Command Line) باز خواهد شد.
(و یا عبارت cmd را در کادر جستجو وارد کنید)
2- در پنجره خط فرمان، این دستور را وارد کنید و اینتر را بزنید:
shutdown -s -t 600
عدد بالا (600) نشان دهنده این هست که این سیستم چند "ثانیه" بعد خاموش
شود. شما میتونید برای زمان مورد نظر آن را برحسب ثانیه تنظیم کنید. مثلا
اگر میخواهید سیستم 10 دقیقه بعد خاموش شود، باید عدد 600 را وارد کنید.
برای لغو کردن دستور فوق از فرمان shutdown -a استفاده کنید.
shutdown -a
توجه:
اگر یک برنامه ذخیره نشده در ویندوز باشد، مانع خاموش شدن میشود. اما اگر میخواهید تحت هر شرایطی خاموش شود، باید پارامتر f را نیز به این دستور اضافه کنید. به این صورت:
shutdown -s -f -t 600
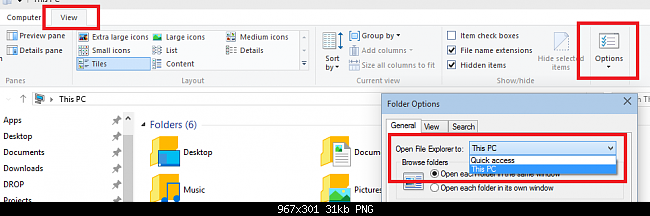
تغییر مسیر کلید میانبر WinKey+E به mycomputer
در ویندوز 10 برای تغییر مسیر کلید ترکیبی WinKey+E از مسیر جاری Home یا Quick access
به My computer یا This PC به اینصورت عمل کنید:
Change Open File Explorer to This PC"